
My 3-year-old daughter outgrew her crib and needed a “big girl bed,” so we designed and built one together in the summer and fall of 2019. Parenting is hard, so here I am, finally writing about it!
I started by making a few dozen low-fidelity sketches of different bed concepts I’d been thinking about for a while. None of them resemble the finished product in any way.
My kid has always loved books, so almost every concept included a reading feature–usually integrated bookshelves. I also wanted the bed to feel cozy. The city is a noisy place, so I thought I would try to employ upholstered acoustical panels to create a space with a built-in sense of quiet while offering some varied surface textures. But my planned wood-Rockwool-fabric assembly was becoming intimidatingly complex, so I abandoned that path. I settled on the idea of providing a sense of enclosure from simple wood sides around the bed with small openings to provide visibility and light.
Eventually, my daughter dictated that she wanted a bunk bed after seeing a large one at a friend’s house, complete with storage-unit stairs. My material of choice these last few years is all birch plywood all the time. I found a good deal of inspiration from the designs of Flexa and Casa Kids.
As I do with every kid project, I carefully researched the appropriate safety requirements, and in doing so learned that bunk-bed injuries are extremely common in her age group. To minimize the risk, I decided to limit the height to what I call a “mid-height bunk,” which rules out a second sleeper below. I would discover later that this results in the perfect height for giving a goodnight kiss.
Much of the geometry of the bed would ultimately be governed by how much rise/run I could get away with on the stair unit. This necessitated “user testing,” so I made an educated guess and built a quick prototype of the stairs with scrap wood and a nail gun. I always forget how fast construction can be when you’re not being fussy. Watching the kids interact with full-scale pieces was so much fun that it gave me the burst of energy I needed to get the project off the drawing board and into the shop.
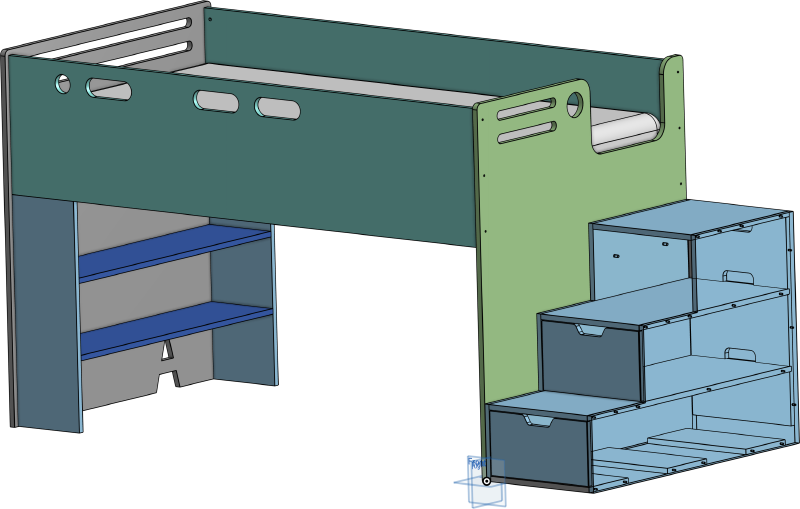
I moved quickly into CAD. It’s rare that I start a CAD design without a fairly complete paper drawing but in this case there were too many variables to play with. It was a big help to parameterize dimensions like the mattress size and side clearance for tucking sheets (the mattress sits at the bottom of a deep box).
I always design for longevity. For this project, I did not wish to make a glorified IKEA piece, but rather something that improves with age, something my kids might want to store and use again. That led to a requirement for repeated assembly and disassembly. So: “no” to nails and glue. “Yes” to cross dowels, connector bolts, and Confirmat screws. And with those things come requirements for precision manufacturing to ensure accurate alignment between pieces. I would need to plan my cuts carefully and lean on tools to help.
Coming up in part 2: constructing the bed.