
The first step in getting a custom bicycle is the fitting process. At the heart of this procedure is a ridiculous-looking stationary bike on which pretty much every length and angle is adjustable. It sounded simple enough. I showed up with bike shorts, shoes, and pedals. We attached an appropriate-looking set of handlebars and adjusted the geometry to closely mimic that of my old bike. From this starting point, we could tune the fit to maximize comfort and efficiency.
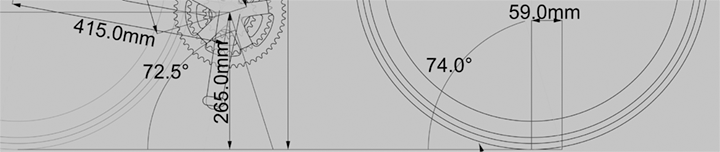
Two things surprised me. First, that I could easily tell the difference between seemingly subtle changes. Would I prefer a seat tube angle of 72.0 or 72.5 degrees? Just like an eye exam, when you have the ability to switch back and forth between A and B, you develop surprisingly strong preferences. Secondly, the number of variables involved is overwhelming to the novice. I came in thinking about quantities that are fixed in steel, like seat tube length, seat tube angle, top tube length, and so on, but I hadn’t considered the way things like crank length, saddle position, stem length, stem angle, and handlebar shape and placement would affect my perception of the other things. At least your eye prescription involves only three numbers! (And you don’t have to break a sweat verifying the results.)
One of the most satisfying things about the fitting process was dialing in geometry based purely on biometrics. The top tube height will provide just the right amount of stand-over clearance from my crotch, and the saddle will be positioned so that my patella is directly over the pedal spindle at 3 o’clock and 9 o’clock, maximizing power transfer. The latter is verified with a plumb bob.
As good as the fitting process is, I left with a few big questions. One was crank length. Should I stay with 175 mm or switch to 172.5 mm? The fitting bike offered the ability to change this variable, but while I could tell the difference, I still did not develop a preference. The industry has developed all kinds of “rules” but the biggest factor seems to be cadence. I read a bunch of academic studies on cadence vs. efficiency, but within the range of “reasonable” values the results seem inconclusive. Maybe it’s just a preference?
A more challenging variable was steering geometry. How would I like my bike to steer? Responsive, fast, and twitchy? Relaxed, slow, and self-centering? This is something I had never thought about. Unfortunately there exists no gadget to evaluate all the variables—the fitting bike, being stationary, has no need for steering! My builder proposed some numbers that resulted in a seemingly high amount of trail. Not wanting to come this far and get something I don’t like, I did my research, compiling head tube angles and fork offsets for a variety of bikes. We came to a compromise that achieves a high-side-of-average trail with an unusually steep head tube angle and an unusually small amount of fork offset. (I am getting a handmade fork, so why not?)
One decision proved dramatically more difficult than all the others. The repercussions could be quite serious. On this decision, I waffled well beyond the drawing approval stage. I consulted with friends, toured bike shops, and scoured the Internet for help. I refer, of course, to the choice of color. Color is not a strength of mine, and the complete lack of restrictions made it all the more difficult. One color, two colors, or three? Fades? Flames? Masking? Metallic flecks? Iridescent finishes? Custom graphics under the clearcoat? I spent two weeks with a PPG automotive swatchbook to no avail. I wanted a paint job that was simple, attractive, and not overly flashy. I also wanted a color that was unavailable in a store-bought bike. Finally, inspiration struck in a Ducati motorcycle showroom: I found a Sport 1000 motorcycle painted in a gorgeous 1970’s retro yellow. Incredibly, Ducati lists no aftermarket paint formula for this color, but the painter said he would eyeball it. We’ll see how that turns out.
Continued in part 3…
amanda ()